There are A LOT of photos ( a total of 26!) taken to make this Kimono. Washi is suggested due to the lightness of the paper. FYI: SU solid paper will be difficult to fold as it is more dense and thicker. Try SU DSP, which may work since it is thinner. Use copy paper to practice....................here goes:Left Photo: Start with a 6" x 6" Square piece of Washi. Right Photo: Fold diagonally, crease as shown.
 Left Photo: Open, fold diagonally, crease as shownRight Photo: Open, fold bottom corner to center, crease and unfold
 Left Photo: Fold top corner to the fold line created (above right photo). Pencil line is marked to show the fold line.
Right Photo: Unfold, then fold top corner to the crease line just created on the left photo. Pencil line is marked to show the fold line. The center of the 6x6 is lightly marked with a pencil.

 Left Photo: fold right side, match edge of top corner as shown
Right photo: fold back the "wing", matching the edge to the side

 Left Photo: repeat for the left side
Right photo: Fold up the bottom point to meet the center
Left Photo: fold top edge toward the center (that's why there is a pencil mark for the center line) - see pink arrow
Right Photo: unfold, take top corner to fold up toward the top

 Left Photo: fold down the top corner - this is the kimono collar
Right Photo: to create the sleeve, this is the side view. Do a "pleat fold" - this is the Kimono sleeve. Note: The width is 1-1/4".

 Left Photo: view after "pleat fold"
 Right photo: make a triangle, fold down the corner - see green arrow

 Left Photo: Origami verbiage called the next fold a "swivel fold and squash fold" Translation: fold back the left side toward the center.
Right photo: See green arrow - press down the triangle.

 Left Photo: repeat fold for the left side
Right Photo: Pull out Kimono bottom at an angle and fold - see green arrow

 Left Photo: Pull out the inner layer - see green arrow (this is the small piece)
Right Photo: Fold toward the side - See green arrow
Left Photo: Fold bottom corner of sleeve up
Right Photo: Flip Kimono over, this is what it should look like.

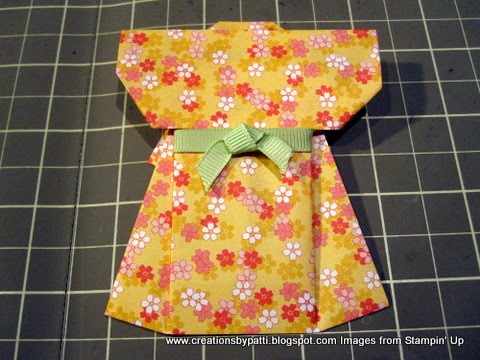
 Left Photo: 3/8" wide grosgrain ribbon is a added embellishment. Tuck under the fold with a mini glue dot.
Right Photo: Complete grosgrain to the right side with a mini glue dot. Finish it off with a single knot also attached with a mini glue dot. KIMONO IS COMPLETE
Thank you for your patience...................let me know if there any questions. I look forward to everyone making this Kimono.
Embossing folders used for previously posted Kimono Cards - please e-mail me for the info.