Thursday, January 31, 2013

Year of the Sheep Blog Hop

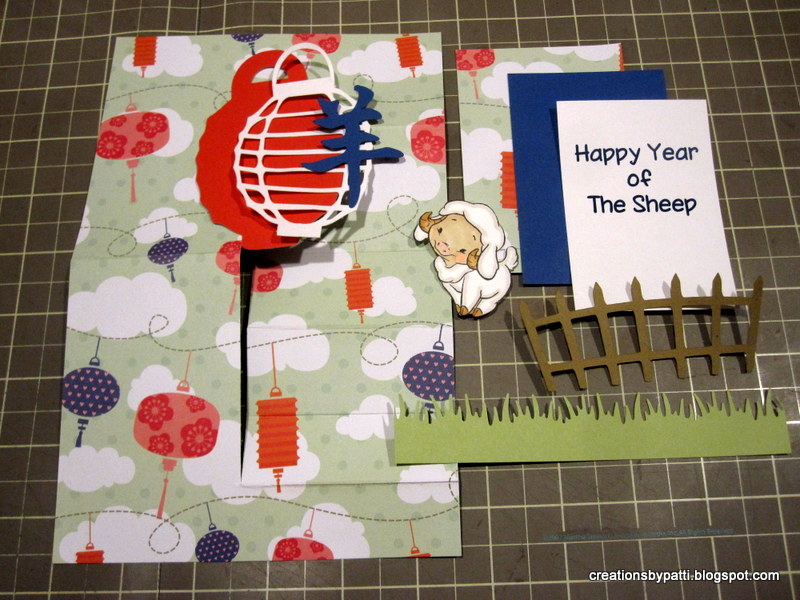
Welcome back today for the 2nd posting of the Sisters Stamps second release of the Zodiac Stamp sets: The Year of the Sheep. The Sheep image is being release at this same time as the Year of the Monkey on February 1, 2013. I chose a "Side Step Card", tutorial can be found at Split Coast stampers here.  The Asian Lantern is from the Silhouette Store here. Pattern paper used is from My Little Shoebox Aiko - Festival. I was so concerned about the lanterns being shown but in the end, it got all covered up with other images.  
The Asian Lantern mat is cut using My Little Shoebox Aiko - Lipstick & Sage solid paper matching the Aiko Collection with White card stock. The Sheep Kanji on the lantern is cut using SCAL (Sure Cuts a Lot) from an image on line . Blue card stock from Recollections paper pack. The entire lantern is popped with foam squares. natural twine is used as the finishing touch through the lantern top.
The removable note card is 2-3/4" x 4" using the My Little Shoebox Aiko - Festival paper. A blue mat and message printed using of course, blue ink from my computer Chinacat Font style. Those cute little lanterns were scraps cut from the My Little Shoebox Aiko - Festivals paper, popped with foam squares.
Side view of card:
Sister's Year of he Sheep copic color details: E34, E31, E42, R20, W1. Cut , then popped with foam squares. Martha Stewart Grass punch in SU Certainly Celery used across the front bottom edge. 
Card back: see the lanterns............
To make this card:
(1) 5-1/2" x 8-1/2"
(1) 2-3/4" x 4" pattern paper mat
(1) 2-1/2" x 3-5/8" Blue mat
(1) 2-3/8" x 3-1/2" White computer generated message
(1) 2-3/8" x 3-3/4" Lantern Mat cut in Lipstick & Sage from My Little Shoebox Aiko - Festivals
(1) 2-1/8" x 3-5/8" Lantern cut in White Card stock
(1) 1-1/2" x 2-1/4" Sheep Kanji cut in Blue
(1) 1" x 5-1/2" SU Certainly Celery Martha Stewart Punched Grass
(1) 1-1/2" x 3" Recollections Kraft SVG Cut Fence
'Hope you enjoyed this project. Happy crafting to all of you.
Please join the others who are participating in this exciting Year of the Monkey & Sheep release for their posting:
Linda: http://simpleandsassycreations.blogspot.com/
Laura: http://bytkg.blogspot.com/


Wednesday, January 30, 2013

Year of the Monkey Blog Hop

Hi Everyone, I am very excited to be one of the participants in the Sister Stamps Zodiac hop for Release #11: Year of the Monkey and Year of the Sheep. These stamps are available for purchase on February 1, 2012.  For this card, the style is called a "Shadow Box Card" . The tutorial for this card can be found on Split Coast Stampers here. I have used a combination of a Silhouette Cut File, SCAL (Sure Cuts a Lot) Cut file, embossing folder, and die to make this card.............somehow it got a bit complex.............finished card size is 5-1/2" x 4-1/4. card base is Black color.
Top view of the card: 
Back view is solid black:
When the card is completely flat, the width is 7-1/2" The black lattice frame is from the Silhouette Store here. It was easy to cut the Gold mat (paper from Recollections Metallic paper pack) behind the lattice frame by tweaking the Silhouette Lattice frame cut file. The red paper is embossed using the Cuttlebug Asian Folders. The hexagon shape is using SU Naturals Ivory Card Stock cut using the available shapes from the SCAL library. The Monkey Kanji was a file found on line and cut using my SCAL/Silhouette.
The Sister's Year of the Monkey Copic color details: E34, E31, E42, R21, R20. After cutting, he is popped with some foam squares. The Cherry Blossom was made using the Memory Box Woodland Branch in Brown card stock. The flowers are Punch Bunch Cherry Blossoms with red lined centers. Adhere these small flowers randomly with dots of wet adhesive.
Two Memory Box Woodland Branches were cut. One used for the inside.  The other was cut in half, used for the top and used for the bottom.
Here's the cute Monkey playing with some Cherry Blossoms (so sorry he is out of focus):
Components to make this card:
(2) 4-1/4" x 7-1/2"
(2) 3/4" x 4-1/8" Red Embossed Panels
(1) 4-1/4" x 4-1/2" Center Red inside panel: emboss
(1) 4" x 4-1/2" Gold Mat
(1) 4" x 4-1/2" Black Lattice Frame
(2) 1-7/16" Black Hexagon mat 
(2) 1-5/16: SU Naturals Ivory Hexagon computer generated message with Kanji cut.

For this specific shadow box card, the measurements used are as follows:
Cut (2) 4-1/4" x 7-1/2", score on the 7-1/2" side @7/8, 1-3/8", 6-1/8", 6-5/8"
Cut a window in one of the 4-1/4" x 7-1/2" panels.


Sticky tape is used to make the shadow box.  Foam square/Dimensionals are added to the Monkey image and Hexagon shapes.

To make the flowers, use a Punch Bunch Cherry Blossom punch. Then use a red ink pen to make the centers. If you have a rounded tip and a mouse/foam pad, then you can punch down to pop the flowers up to be more realistic.

This photo is a bit out of focus but hopefully it will show how the inside branch is positioned: 1-3/8" from the top edge, adhere with wet adhesive so the branch "floats" in between the panels. Then sandwich the front and back panels with the sticky tape.


 Stay tuned tomorrow for the Year of the Sheep image being released at this same time as the Year of the Monkey. Hope you enjoyed this project. Happy crafting to all of you.
Please join the others who are participating in this exciting release for the Year of the Monkey and Sheep:
Linda: http://simpleandsassycreations.blogspot.com/

Tuesday, January 29, 2013

My Little Shoebox Sale

Here are the details if you live in the San Francisco Bay area:

Friday, January 25, 2013

Happy Birthday Lauren!!!

A birthday card made using the Silhouette on line store A2 Cake Card. can you believe this cut file is only 99 cents and if you belong to their monthly program, it is even less! Finished card is 4-1/4" x 5-1/2"  This card is great with some bling actions and has the 3D effect, too. There is a scallop at the edge of the card opening. Double sided paper used from Momenta. I got it from Ross a while back and have used it for numerous projects. Lavender and brown card stock all from Joanne's. Not much card stock needed to complete this project. A Lavender Organdy Ribbon is on the fold with a bow. Cake is popped using Dimensionals.
             
Letters were also made using my Silhouette to cut, the background mat (they call it a 'offset") was really simple to make and merging as well as slanting some of the letters was really simple to do......drag and move................Stardust Stickles used on the white letters.
Open the card to reveal the stamped message. I used 2 different stamp sets to make this message.  "Happy" is from Papertrey Ink's Big Birthday Wishes and the rest of the stamped message is from Stampendous Fifteen Candles.....worked out great!
Here's the cake top: a heart that has Glossy Accents with Recollections adhesive rhinestones.
Inside heart is the negative from the cake top: also layered with Glossy Accents

The icing on the cake has Stardust Stickles and also embossed with Sizzix Dot Swirl Embossing Folder as well as Recollections adhesive rhinestones.
And, I love this Handmade stamp I got long ago.............

Have a great crafty day!


Monday, January 21, 2013

Dandelion Year of the Snake

Another calendar; One that can be on a wall. This one measures 3-3/4" x 8". Like the decorative frame? It's from the Silhouette on line store (for 99 cents): called Square Boarder Note Card where it has been sized it to finish 3.93 X 3.315. Inside pattern paper was cut separately (since you can "ungroup" the image and only cut the inside shape using the Silhouette).   The pattern paper from Karen Foster - Dragon.  The stamp used is Dandelion Designs MC-37 Year of the Snake using Black Momento ink on white Neenah paper. Add a gold cord around the neck, then pop up with dimensionals. .
The snake at a closer view: Copic colors used R59, R37 and a Gold Jelly Roll pen (for the tongue). The stamped "Year of the Snake" and Asian Kanji word is stamped using Versamark, then embossed with black embossing powder.

More details of the hanger: Large Black Eyelets with 1/4" Black grosgrain ribbon cut 10" long. And, don't you just love this textured paper - can you believe it is from Recollections Red Cartulina? It's part of their specialty line.
Here's the back of the hanger: instead of knotting the ribbon, use sticky tape so it will be flat.
Some additional details on how to make this project:
(1) 3-3/4" x 8" Black card Stock
(1) 3-5/8" x 7-7/8" Recollections Red Cartulina
(1) Square Boarder Note Card Frame cut in Black - sized to 3.93 x 3.315
(1) Square Boarder Note Card Frame inside cut in pattern paper (stamp/emboss images)
(1) Calendar
(1) Calendar mat
I love how this turned out.................it was fun to make.  Have a great crafting day to make some for your friends, too.