Tuesday, December 25, 2012

Nutcracker: Santa's Suit

MERRY CHRISTMAS EVERYONE!!!!!
This is the second of many new ones since I resumed posting yesterday. This Santa Suit nutcracker was made for a family friend. This is an SVG cut file (using SCAL computer program and my Silhouette to cut) from my favorite on line store: SVGcuts.com. The cut file is called Clara's Christmas Eve SVG Kit which can be found here. My very first nutcracker was posted here using Graphic 45 Nutcracker designer paper. This one is using retired SU Holiday Flocked designer paper for the clothing that I had been keeping for a while.  The SU Holiday paper collection also had smaller all over red/white designer pattern that worked well for the cuffs and top of the boots. Time to use some of that paper!!! I have also been using the retired SU Blush Blossom for all the hands and heads for the nutcrackers, too. I still have plenty in my stash because one package goes a long way..........
Back view:
Side view:
Hat detail: Clear adhesive rhinestones (from Recollections) and also a red "feather" with a red adhesive rhinestone (from Recollections).
Top of the hat is a metal snowflake (from my stash) and a white plastic snowflake made by All Dressed UP (button company). Black card stock is AC paper with a slight texture.
His beard is using a simple dot embossing Cuttlebug folder. Silver paper across the chest with clear adhesive rhinestones (from Recollections)
My autograph under the back body:
Boot detail: also metal snowflakes attached using mini glue dots
And, of course smaller adhesive rhinestones on the cuff
I love how this one turned out -so elegant and fun! Stay tuned tom for yet another nutcracker.

Monday, December 24, 2012

Nutcracker: Making Cookies

Wow: has it really been almost 3 weeks since I have posted anything on my blog?  I guess so, because I have been making many nutcrackers.  This is the first of many new ones.  This cooking/baking nutcracker was made for my annual Cookie Swap hostesses and a couple friends.  This is an SVG cut file (using SCAL computer program and my Silhouette to cut) from my favorite on line store: SVGcuts.com. The cut file is called Clara's Christmas Eve SVG Kit which can be found hereMy very first nutcracker was posted here using Graphic 45 Nutcracker designer paper.  This one is whimsical with some candy canes in the hat and an added apron in front which holds cookie cutters, gingerbreadmen, rolling pin, wooden spoon along with other "surprises". 
Back view:
Side view:
Some details: candy canes cut from a garland I found in my stash of holiday crafting stuff. Tie is embroidery floss, attached using mini glue dot. Love the red adhesive rhinestones.

Top of the hat is a small plastic "cookie" found in your local craft store used for miniature trees. Stickles is added around the top of the hat for more "shine".
Beard is embossed using a dotted swirl Cuttlebug embossing folder:
 Apron details: Small wooden rolling pin sponged with SU Close to Cocoa, adhered using a hot glue gun.  The Gingerbreadmen and cookie cutter, along with heart are from the "Dress it Up" button packets (shanks need to be cut off). These items are adhered using a glue gun.
 The wooden spoon is made using Recollections Kraft paper, sponged using SU Close to Cocoa ink, add a embroidery floss bow. To make the spoon, cut file from SVGcuts.com used: Gingerbread Chalet Village found here.
How about a paper hot pad (from SVGcuts.com SVG cut file Gingerbread Chalet Village), embossed using a argyle embossing folder. Baked with Love is also part of the contents from the "Dress it Up" bag. These are dangling from the nutcrackers right arm.
The boots also have the same candy canes cut from the garland with embroidery floss bows:
 Nutcracker back:
 And, of course my autograph with the year had to be hidden out of sight (underneath the body in back).
Additional info: Paper is Bazzil White. Base and apron paper is from Recollections Christmas 6x6 pack. Adhesive Rhinestons area ll Recollections.
 
Stay tuned for more nutcrackers to be posted tom......................and thank you all for your patience while I catch up on my blog posting for the holidays.

Friday, November 30, 2012

Year of the Horse Sister Stamp Blog Hop

Welcome back today for the 2nd posting of the the newly released Sisters Stamps Zodiac Stamp set: The Year of the Horse. For the Horse image being release at this same time as the Year of the Snake, I chose a similar kind of Pop 'n Cut" card. SVG cut file is from Paper Pulse. For those who have SCAL2/3 and can use your Silhouette to cut this FREE cut file can be found here. The medallion is a SVGcuts.com cut file sized to be 3-1/2" and can be found here. The message "happy" was made using my SCAL computer program: cutting the words using the FREE font style Lavenderia Sturdy and making a shadow (offset). Nothing on the card front was popped with foam dots since the card itself was bulky enough.
Slowly open the card to reveal a lot of dimension inside:
Year banner is cut using Arial font on the SCAL library. Banner (also part of the SCAL library)is popped with foam tape:
Inside medallion is cut 2-3/4", then adhered with foam tape: The newly released Sisters Stamps Year of the Horse Copic colors used E29, E44, E55, E27, E21, E34. Originally, the image was to be positioned on top of the medallion but then I decided to position it in between the stage and the pop up so I used my craft knife to cut a slit in the stage. Then used a clear acetate strip as the pop up. The acetate is anchored inside the stage. The Horse image is attached using sticky tape. Instruction for the Floating Floor (stage) can be found on Karen Burniston's blog.
There were some scraps from cutting the inside so I decided to use it for the shadow of the Horse Kanji. The Kanji is a clip art imported into SCAL and cut using my Silhouette.  Making the shadow was simple. The Horse Kanji is adhered to the punched (Martha Stewart) grass using foam tape.
Bottom inside card is using the left over Bo Bunny Serenity scrap from the front. Letters are cut out using Arial font with SCAL
Side view of the card and the mechanics:

Components to make this card: lots of pieces. 
More details:
Paper: Bo Bunny Serenity Collection, SU Cherry Cobbler, SU Certainly Celery, Recollections Black, Recollection Vanilla, Neenah White
Ink: Brown to sponge the edges , Momento Black
'
Hope you enjoyed this project. Happy crafting to all of you.
Please join the others who are participating in this exciting Year of the Horse release for their posting:
Eunice: http://astarforchiemi.blogspot.com/
Linda: http://simpleandsassycreations.blogspot.com/
Laura: http://bytkg.blogspot.com/

Thursday, November 29, 2012

Year of the Snake Sister Stamp Blog Hop

Hi Everyone, I am very excited to be one of the participants in the Sister Stamps hop for Release #10: Year of the Snake and Year of the Horse. This release is available for purchase on December 1, 2012 which is just in time to celebrate the upcoming Year of the Snake on February 10, 2013.  This these Zodiac animals are the first of a series of releases so stay tuned for more as the year unfolds. For this release, I chose to make a " Pop 'n Cuts Spinner Card" like the one shown on Karen Burniston's video here (all measurements on her video) using the Snake image.
The bamboo on the left side: SVG Bamboo cut file from Design on Cloud 9: Chinese Takeout found here
Open the card to reveal inside:
 Fully opened card:


2013 is made from using the font on the SCAL library and making a shadow. The reverse (mirrored imaged) is used on the inside of the acetate.
The newly released Sister stamp snake image: Copic colors used for the snake: G21, G24, G99, G85 and Darice Bamboo embossing folder on the background mat. Year of the Snake is computer generated using Comic Sans font

Snake Kanji is cut 1-1/2" x 1-12" with a shadow (offset) made from clip art and imported into SCAL/cut with my Silhouette.
Top and bottom  card view:
More Details:
Paper: Bo Bunny Serenity mat stack, SU Old Olive, Clear Acetate, Recollections Vanilla, Recollections Black, Neenah White
Ink: SU Close to cocoa (for sponging edges), Momento Black
And here what my components look like (note: I did not use the talking bubble shown)
Here's how I made the swinging arm for the computer generated message (follow Karen's video)
 So the last step is to pop the image with foam tape:

Stay tuned tomorrow for the Year of the Horse image being released at this same time as the Year of the Snake. Hope you enjoyed this project. Happy crafting to all of you.
Please join the others who are participating in this exciting release for the Year of the Snake:
Eunice: http://astarforchiemi.blogspot.com/
Linda: http://simpleandsassycreations.blogspot.com/
Laura: http://bytkg.blogspot.com/

Monday, November 26, 2012

Happy Memories Album

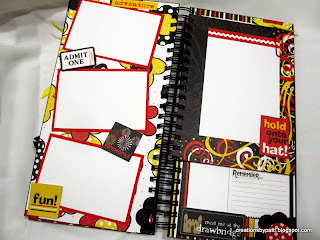
We all need one of these Mini Albums after a fabulous trip to the happiest place on earth: Disneyland. One of my favorite blog friends went with her family this Summer. For her belated birthday, this was the perfect gift!  The mini album kit is from Pine Cone Press, their 6" x 12" Happy Album found here. This mini kit includes all the details to cut each page and includes everything seen here. I decided to use my Bind it All instead of rings enclosed in the kit. I also added more tags, my own red paper clips and buttons. Here are the photos of each page.....self explanatory.......and quite fun to make and give. Most of the tags and images were used and very little scraps left over. This is the front cover:
And here are are various pages: Some have pull out mats (different from the original instructions):
 With a left over strip, a pocket was added to hold more tags:
 More photo mats added to the pocket:
 This kit has smaller fun pages which were very interesting:
 I popped this "Memories" image to enable a pull out:
 This is where I stuck a corner flower and made it into pocket to hold tags. Buttons are added to the top of the tags to cover the staples.
See the pull out mat? And, I love the last inside page where pockets were made to hold autographs.
 Back cover:
It was fun to pass this mini to her personally........the look on her face was so precious!