Tuesday, November 15, 2011

Sleigh Treat Holder

Nothing like having a sleigh to hold some treats (or shiny Christmas balls) for the holidays. This is the first of the Santa's Visit SVG cut file from SVGcuts.com. There are many sleighs out there but I happen to just love the swirl rails on this one and the amount of layering on the sides. While most have the "holder section" as a "box"......this one is shaped oh ever so nice! I did make a 'shadow" cut for the white behind the SU Flocked Red/White Damask paper (yup, I've been hoarding this fabulous paper for a while!).

The wreath is on both sides of the sleigh: got this FREE cut file on line. I do believe this wreath is available from the Cricut cartridge: "Tis the Season".....it is cut at 2-1/4" with two color greens (scraps are wonderful for these small embellishments). Add some adhesive red rhinestone clusters and Red Stickles with sponging done using SU Old Olive ink makes this wreath nice!!!! The wreath is popped with dimensionals.

Here's a look inside the sleigh. Project measurements: 7-3/4" long x 2" wide x 4-3/4" high. The inside sleigh area is 2" x 4-1/2".

A look at the underside of the sleigh:

Well, this is only the first of the Santa's Visit SVG Collection........so stay tuned for more projects.
Supplies:


  • CS: SU Chocolate Chip, Recollections White, SU Real Red, SU Flocked DSP, Recollections Green scraps

  • Ink: SU Old Olive

  • Accys: Red Stickles, Tombow Adhesive, 2 Way Glue Pen, Dimensionals, Adhesive Rhinestones, Sponging Daubers
Hugs until tom................

Monday, November 14, 2011

Holiday Crackers

A short posting:
This is the easier party treat I've ever made............it's a SVG cut file from SVGcuts.com and is part of the Gingerbread Chalet Village Collection using the SCAL (Sure Cuts a Lot computer program). It sure beats cutting each and every one of those triangles to make this project...............(urgh...........and I used to do that, too). The finished size for this treat is 6 x 1-1/2". It was a snap to make. Some of the treats can be three chocolate kisses, folded up currency, or small charms. They can also be embellished with so many choices to even further glam it up.

I made two of each pattern paper for now:

Here's what the computer screen looks like......no dies......just cut. I adjusted the original cracker size so it will fir four on a 12x12 page.........nothing like using every inch of the paper.......ahhhhhh.

Supplies used: AC Christmas paper, 1/4" grosgrain ribbon, Sticky Tape........and that"s it!!!!

Yay....is this the easiest or what?

Friday, November 11, 2011

Baking Card

This is the second of three projects using SCAL (Sure Cuts a Lot) from the Gingerbread Chalet Village SVG cut file from SVGcuts.com. This Baking Card finished size is 5" x 7.............I thought of reducing the card size but wanted to try this at the original size first..............I love it!!!! It turned our so cute and ALL of the elements can be used separately to make a banner (now there's an idea...............) or a Cookie Exchange invitation, Scrapbook, Thank You card, or a bunch of ornaments for a tree in the kitchen!!! The cookie is good enough to eat.

The mitt texture was made from using the SU Perfect Details Sizzix Texturz Plate, edges are sponged using SU Cherry Cobbler ink. I made a "shadow" for the wooden spoon, sponged the edge in SU's Close to Cocoa and inked the spoon using a Wood Background stamp. For some contrast, added the white CS for the tag. Old Olive tag is sponged with the same: SU Old Olive ink and then tied with Red/White twine (from Pineapple Cove). A white Gel pen is used around the spoon for a little more accent.

The COOKIE: I love that cookie.........there are four layers.......so that's why it looks soooo good. The Kraft edges are sponged with SU Close to Cocoa and a white gel pen is used for some accents.
And, finally, card inside........edges are sponged with SU Cherry Cobbler and SU Close to Cocoa

When making this card, make sure an envelope is at hand, then start layering the elements on.

Start with the Spoon and tag:

Then the candy cane and finally the cookie, popped with dimensionals:

Like it?
Supplies:


  • Stamps: SU Sincere Salutation, SU Wood background


  • CS: SU Real Red, SO Old Olive, SU Soft Suede, Recollections Kraft, Recollection White, Misc. Stripe DSP Scrap


  • Ink: SU Old Olive, SU Close to Cocoa, SU Cherry Cobbler


  • Accys: Gingerbread Chalet Village Baking Card from SVGcuts.com, SU Perfect Details Sizzix Texturz Impression Plate, White Gel Pen, Dimensionals, Sponge Daubers, 2 way Glue pen, Twine
Thank you for stopping by and stay tuned for one more project from this collection.............

Wednesday, November 9, 2011

Gingerbread Chalet Village

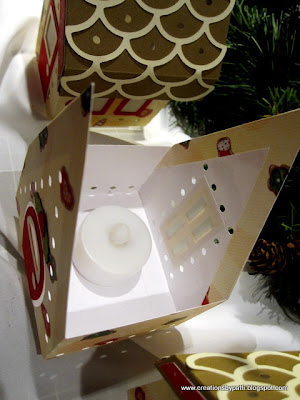
Ooooh.............here's a Gingerbread Chalet Village cut file from using my SCAL (Sure Cuts a Lot)program from SVGcuts.com. Soooooo cute and adorable. They are all so yummy.......that icing on the roof is good enough to eat!!! These three Chalets are slightly different in style and in size but overall, they are 4" x 5" x 3-1/2". They are all just the right size. Windows and doors have vellum windows............why?..............why, of course so tea lights can be put inside the house!!! Yup, tea lights.........the ones you can find a your local Dollar Store. (I think they are 4/$100). Holly berries were added to top of the doors. The holly berries can be found in the library of the SCAL program - cool, eh? Of course I didn't have the right size punch or cartridge that worked and the library was a great way to finish off the house.

Here are the houses with the tea lights inside............nice!!!

All the roofs can be removed to easily place the tea light inside......and those roofs - whoa, they are really sturdy........or some other goodies........too!! The Christmas Cookies DSP I had (from my stash) wasn't thick enough so I added re-enforced inside edges.

Chalet #1:

Chalet #2:

Chalet #3:

Of course, Mary at SVGcuts.com has a great video on how to assemble these houses to make it so easy. And, remember, if tea lights is not your fancy, remove the many "holes" and make these house into gift boxes or make them smaller for ornaments on a tree!!! The different style of houses makes them flexible for any occasion and not just for the Holidays!!!
Supplies:


  • Stamps: none

  • CS: Recollection Kraft, Recollection Vanilla, SU Real Red, Card Stock Vellum, SU Old Olive, SU DSP from Sale-a-Bration, American Traditional Designs Holiday Cheer Christmas Cookies DSP

  • Ink: none

  • Accys: Gingerbread Chalet Village from SVGcuts.com, SCAL Library, 2 Way Glue Pen, Tombow Adhesive

Thank you for stopping by today...........a couple more projects are coming from this Gingerbread Chalet Village Collection....so stay tuned.

Monday, November 7, 2011

Setsuna Holiday Pop Up Stage Card

This Pop Up Stage was so much fun to make. I had been waiting for the opportunity to do this card. For the full video tutorial on how to make this card by Kim Score, visit the Splitcoast Stampers Resources or Kim's blog. Kim's instructions are clear and easy to follow. The sleigh (used in the card outside and inside) is from a newly released SVGcuts.com cut file called Santa's Visit - you are just gonna love this cut file collection!!! As I have soooo much paper in my stash, I found this one from one of those SU sale-a-bration events a couple years ago that worked out well for this card. The pattern is small enough to be a background in the card front and also part of the inside sleigh.

Stardust Stickles added to the red section of the sleigh. Sleigh is popped with dimensionals. These trees are using the Cricut Cartridge Christmas/Noel cut at 4" (doesn't look like 4" - huh?). The sleigh is cut at 3" x 2" and only 2 layers were used.......the twine is from Pineapple Cove and puts the finishing touches on this card. Note: this twine has a thicker red showing than most twine.

Slowly open this card..........................

revealing a multi layer pop up stage.....................inside trees are cut using the Cricut Cartridge Christmas/Noel cut at 5" and " 6", adhere to the SU Bashful Blue CS. Dots of Stardust Stickles sparkle in the "sky".


Here's the side showing the various layers and the tabs underneath the stage........clear acetate was used as the pop up mechanism instead of cardstock.

Copic colors used:
Face: R20, E21, E00
Boots and Belt: W5
Hair: W10
Hat Brim, Ball, and Beard: W1
Clothes: R59, R35, R46 And, add a little Gold Smooch, too. After coloring, add Stardust Stickles to the brim of his hat, ball in hat, and beard.

Here is a view of setsuna at the "snow" level".............torn paper added for the snow (caps are dusted with Stardust Stickles)

And here is that beautiful sleigh..................am loving all the layers and detail swirls. This SVG cut file was resized and cut at 4-1/2" x 3". The original size of this sleigh was meant to be a box party favor (soon to be posted for your enjoyment, too)

Supplies:


  • Stamps: Setsuna Sister Stamp, SU Sincere Salutations

  • CS: SU Cocolate Chip, Neenah White, SU Bashful Blue, SU Real Red, SU Garden Green, Misc. SU DSP

  • Ink: Momento Black

  • Accys: SVGcuts Cut File Santa's Visit, Copic Pens as listed above, Red White Twine fm Pineapple Cove, Stardust Stickles, Gold Smooch, Cricut Cartridge Christmas/Noel, Dimensionals, Sticky Tape, 2 Way Glue Pen, Acetate scrap

Thank you for stopping by today............................