Monday, August 23, 2010

Owl in a Folded Frame

Now I hope this is an inviting photo - another fun workshop for the month of August. What in the brown shopping bag? Each attendees project was in the bag and it came in very handy for them to take all their projects home. Are you surprised I have a red vinyl tablecloth?
.
This is one of the projects made:
I am so glad this frame has a tutorial on Split Coast Stampers.........check it out. It is called "Folded Paper Frame".

Here's a closer view of the "frame" set at an angle on the card. I did adhere the frame but they are so stubborn, they won't stay down so I let them flap around and it just makes the card more dimensionals than intended.

Closer view of the stamped message which is popped with dimensionals:

To make the Owl:
(1) Chocolate Chip body
(1) Vest in Crumb Cake Sold CS - use SU Exclusive Dot Impression Folder
a pair of Rose Red Solid CS large Eyes
a pair of Very Vanilla Solid CS medium eyes
a pair of Black Solid CS for the smallest eyes
Assemble, using a 2 way glue pen, good rested eyes, and a pair of tweezers for the smallest black eyes. Pop with dimensionals and set aside.

To make this card, you will need:
(1) 8-1/2" x 5-1/2" Rose Red Sold CS, on the 8-1/2" side. score @4-1/4"

(1) 4" x 5-1/2" Very Vanilla Solid CS
(1) 3-3/4" x 5" Pumpkin Solid CS - use the Big Shot Dot Texturz Plate for the subtle dot background
(1) 4" x 4" Sweet & Sour DSP
Scrap So Saffron to punch leaf from the Two Step Bird Extra Large Punch (branch not in photo below)

Following the instructions from Split Coast stampers, the (1) 4" x4" DSP becomes a fabulous frame to "house" the punched owl.

Supplies:
  • Stamps: "Thank You" from Because I care (Hostess)
  • CS: Rose Red, Very Vanilla, Pumpkin, Chocolate Chip, Black, Crumb Cake (Kraft) So Saffron, Sweet & Sour Specialty DSP
  • Ink: Rose Red
  • Accys: Scallop Oval Punch, Large Oval Punch, Two Step Bird Extra Large Punch, Two Step Owl Extra Large Punch, SU Exclusive Dot Impression Folder, SU Exclusive Background 1 Big Shot Texturz Plates, Dimensionals, 2 Way Glue Pen

Thank You for Stopping by today........stay tuned for a full week of projects from this workshop.........

Friday, August 20, 2010

Starbucks Cup of Coffee

I loved making this project - I think it took me less than 30 minutes!!!! I got one of the Starbucks coffee sleeves, used my 2" punch to pop out the logo. Then pop the logo with dimensionals.

Here's the inside of the "cup" - lined in Glorious Green CS (matching the Starbucks color). This outside of the cup is the inside of a Cheerios Cereal Box - it's naturally that kraft color! First, glue the Glorious Green CS on the Cheerio printed side, then cut out the tea cup -----makes assembling this project a breeze.

2 Gift Cards, raw sugar packets, and that Starbucks coffee stirrer:

Here's the bottom side of the "Saucer"

Supplies:
  • Stamps: Vintage Labels (retired SAB)
  • CS: Glorious Green (retired)
  • Ink: Glorious Green (retired), Black
  • Accys: Sizzix Tea Cup Scoreboard Die, Sticky Tape, Dimensionals, Jute (non SU), 2" Circle Punch (non SU)

Thank you for stopping by today...................Have a great weekend!!!

Thursday, August 19, 2010

Wow - Another Award

Wow - another award received this weeked.

It's a Very Modern looking award in shiek black and white colors. I received this from a fellow blogger: Krissie (see her blog @ www.strictlysatmpin.wordpress.com). THANK YOU KRISSIE for the recongition. I am to pass this award on to 5 others who are an inspiration to me:

1. http://www.blinkthinkink.blogspot.com/
2. http://www.valitasfreshfolds.blogspot.com/
3. http://www.papercreationsbysusiq.typepad.com/
4. http://www.pinkbuckaroodesigns.blogspot.com/
5. http://www.thequeensscene.blogspot.com/

Pay a visit to the 5 bloggers and also be inspired...................

Wednesday, August 18, 2010

Asian Wrapping Paper Card

The Wrapping paper Bitty Book turned out really well (posted Monday, August 16, 2010). I had some left over pieces of the wrapping paper - I couldn't bear to throw it out so I made this card. Thank you again, Gail for this great paper!

I needed to emboss the Asian Word (Long Life) in the corner - it worked. YOU can emboss wrapping paper just like you would any other kind of paper. Pop the whole section up with dimensionals.
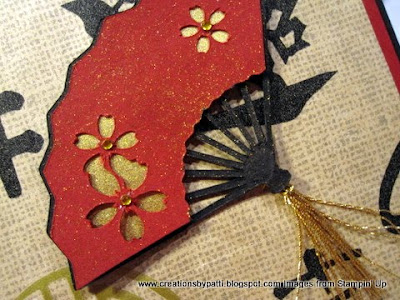
A close-up of the Fan: Gold Adhesive Rhinestones and Gold Glow Smooch Spritz. The Gold tassel is made by wrapping the cords around a few times, then tied. Adhere under the end of the fan with a Mini Glue Dot. Curious about the Fan embellishment? It's from the Cricut Pagoda Cartridge (size: 2"). I did trim the fan down so the black would be slightly exposed.

Here's a close-up of the scroll corner - adhered by using the 2 Way Glue Pen

Card inside has the scroll corners and message:

Supplies:
  • Stamps: non SU
  • CS: Black, Cherry Cobbler, Kraft, Gold (non SU)
  • Ink: Black, Versamark
  • Accys: Scroll photo corners (non SU), Gold Adhesive Rhinestones (non SU), Gold Cord (non SI), Dimensionals, Gold Glow Smooch Spritz, 2 Way Glue Pen, Mini Glue Dot, Gold Embossing Powder.

Thank you for stopping by today..........................

Tuesday, August 17, 2010

Asian Thank You Swing Card

Today I made this "Thank You "card for Juliane - she was so kind to hand me a cute little plastic box filled with Origami paper this past weekend...............I know she sometimes visits my blog and hopefully she will be delighted with this card when I hand it to her later this weekend.
Here's the card opened:
She was painted using a aqua pen with black and real red inks. Cut out and popped with dimensionals. Some gold adhesive rhinestones in her hair buns. The flowers were punched using a retired SU punch, attached with mini glue dots.

Inside view:

Overview:


Here's what is needed to make this card:
(1) 8-1/2" X 5-1/2" Real Red Solid CS, scored on the 8-1/2" side @ 4-1/4"
(1) 2" x 5-1/4" Black Solid CS
(1) 1-3/4" x 5" Real Red Sold CS
(1) 4" x 4-3/8" Black Solid CS, on the 4-3/8" side, score 3/8", then 2-3/8"
(2) 1-3/4" x 3-3/4" Real Red CS
(1) 3-1/2" Black Solid CS Circle
(1) 3-1/4" Naturals Ivory CS Circle
(4) Punched photo corners (small) in Black Solid CS
(5) Small Punched Flowers in Real Red Solid CS
(3) Small Punched flowers in Old Olive Solid CS for leaves

Stamp all Real Red pieces with the Asian image using Black ink:
For the rest of the tutorial, refer to previous posting on March 8, 2010 Flying Crane Card

Supplies:
  • Stamps: All images (non SU)
  • CS: Real Red, Black, Natural Ivory, Old Olive
  • Ink: Black Staz On, Black
  • Accys: Flower Punch (retired SU) , Photo Corner Punch, Gold Adhesive Rhinestones (non SU), Circle Scissor Plus, Dimensionals, Sticky Tape, Mini Glue Dots, Aqua Pen, Asian Embossing Folder (non SU)
Thank you for stopping by today..................