Friday, May 29, 2015

Graduation Gift Card Holder

It's graduation time!!!! A really quick and easy gift card holder to make using very little paper.  This one is using paper from my stash - I happen to have some left over paper using in 2014 - still relevant for today since it is generic.  Use a 1/4" corner rounder punch for the right edges. Gift card holder finished size is 4-1/4" x 3" . A silver elastic cord keeps this holder closed. The silver glitter star is punched using that heavy chipboard glitter paper from Michael's Craft store. Ouch, my hand!!! Lucky i only punched a few of them. "SUCCESS" is from the pattern paper scraps and is popped with foam squares.
Inside: contrast pattern paper:
Took this opportunity to stamp a message using Versmark Ink and White embossing powder. There is enough room in the slot for a handwritten message, too. Use the Stampin-Up Word Window punch and any 1" Circle punch to get this effect. 
Another view:
Back of gift card:
Thank you for stopping by today.

Wednesday, May 27, 2015

Asian Lantern Card

This is another project from SVGcuts.com collection called Spring Blossoms found here This project is called Lantern Card.  The original size of this card was slightly larger so it was reduced to a A2 size so it can be easily mailedUse a Shimmery Pink card stock for the lanterns. Darice Thin Lines Embossing Folder used on the lanterns for a more realistic look (instead of straight lines). Card base is Recollections Purple, with White card stock, and Black card stock On the right side is decorative Hanko Washi paper found on their site here. Card Stock Vellum is positioned in between the top and card base to resemble a real screen. This was not part of the original design but it looks good.  Gold cord used for the top of the lanterns and tassel tops.
Here's a closer look at the lanterns which are popped with foam squares.
Pink adhesive rhinestones on the Cherry Blossoms:
Trim the lantern tassels and snip them at various width for a more realistic look:
Card inside: a strip of Washi paper for some interest and still some space for a hand written note.
Thank you for stopping by today.

Monday, May 25, 2015

Arigato Cherry Blossom Box Card

This Cherry Blossom Box Card is one of 5 SVG cut files from SVGcuts.com collection called Spring Blossoms found here. Pink textured card stock used for the card base, a Shimmery White card stock used for the contrast.  Cherry blossoms are the same color as the card base. Washi paper used for the box card is from Hanko Designs available on their site here. Add some adhesive pink rhinestones on the Cherry Blossom centers to finish them. Brown card stock is from Core-dinations. Added this project, a Dandelion Designs stamp CL-20 Arigato Set is used. More examples can be found here on her blog. Stamp can be special ordered through Hanko Designs.  Finished box card size is 6.3" x 5.8" flat, 6.5" x 5.8" x 4.5" opened. 
Card stock vellum is added to the front and side panels (not part of the original SVG design). Front flap has the "arigato" characters in Japanese calligraphy on a white card stock cut into a scroll with a tail. Clear Star Gelly Roll Pen is used along the edges of the scroll.  Scroll is attached using mini glue dots.
First panel with Cherry Blossoms and Stamped Arigato girl. This larger Arigato girl fit perfectly in the second box card section. 
Copics used to color:
for her Obi n flowers in her hair: RV10, R81, R85. 
for Face and hands: E11, E000, R20
Paper pieced dress is a Yuzen printed paper from my local Daiso Store.
Clear Star Gelly Roll Pen used on the flowers in her hair.
Second Panel: with Cherry Blossom tree.
Back Panel:
Side view:
Box card back: Stamped sentiment from the Arigato stamp set is perfect in this small frame above a spot for a hand written message:
This is the card flat - normally, this can be sent in an envelope but there are so many flowers, it won't stay quite "flat".
Thank you for stopping by today to visit,  stay tuned for another Spring Blossom project.

Friday, May 22, 2015

Lantern Marci Asian Trinket Box

An Asian hinged trinket Box using the Graphic 45 Bird Song Collection papers (retired). You can purchase the La-la Land Crafts Small Hinged Trinket Box on their site here. La-la Land Crafts dies used: Cherry Blossom Flowers, Cherry Blossom Branch, Pagoda Bridge, Open Flourish leaf and can be purchased here.
Copics colors used:
Hair: W2, W4, W6, W8, R21
Face: E000, E00, E11, R20
Lantern: Gold Smooch, R85, RV11
Dress: My Little Shoebox Cherry Blossom (retired) paper piecing
Left side: Hero Arts Woodgrain Stamp on Kraft card stock using Ranger's Vintage Photo ink. Lightly ink around the Open Flourish leaf die using Ranger's Vintage Photo too.  Stampin-Up Pink Passion inked around Cherry Blossom Flowers and Cherry Blossom Branch. Final touch: add Stardust Stickles to the Cherry Blossom centers.
Right side: same process as left side.
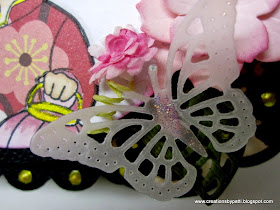
The vellum butterfly: it is a die from Cheery Lyn Designs Exotic Butterfly Small #DL112
Love the vellum butterflies with Stardust Stickles centers:
Box front view: Gold Viva Pearl Pen is used around the scalloped oval.
Box side view: See how thick the Pagoda Bridge appears?  It has been die cut 3 times and layered together so it has that chipboard sturdiness.
Open the box to reveal some wrapped nugget treats:
Two layers of wrapped nugget treats:
Bottom of box covered with black card stock has painted wooden knobs that can be found at your local hardware store.
Thank you for stopping by today..............
 

Wednesday, May 20, 2015

Cinderella 8x8 Scrap Page and Gift Bag

The challenge was to make a contributing  8 x 8 scrapbook page for a group mini album. The theme: Cinderella.  Prince and Cinderella was a FREE SVG cut file from SVGcutting Couples blog hop last year. Perfect timing to use it for this contributing page. A gift bag was made which holds a special surprise inside.
The Lyrics to the Cinderella song can be found on the Internet, mat with a contrast silver and turquoise blue card stock, then pop with foam squares. Two different Martha Stewart Butterfly punches used to punch in white card stock with vellum card stock on top.  Add Stardust Stickles to the Butterfly centers. Pop the butterflies with foam squares, then randomly position them on each side of the page.
Here's a closer look at the Prince and Cinderella image:  Shiny gold scraps used for the Princes embellishments.  Shimmery white card stock used for his glove and Cinderella's glove.  I secured some shimmery turquoise blue card stock for Cinderella's head band and dress, too. Add some pink chalk for their cheeks.
The butterflies:
Here's a closer look at the double layer vellum butterflies.
The wallpaper-like background is a shimmery paper from my stash.  It looks  pretty good as a wall from the castle. 
Now to the gift bag: finished size is 9" x 7" with 5/8" wide White Organdy ribbon handles. The carriage is a SVG cut file from the on line Silhouette store.  The only change made to the cut file is the wheel size: they are larger than the original. The carriage is cut using a shimmery white card stock, trimmed with gold and curtain in pink.  Wheels are black card stock. Use a Gold Viva Pearl Pen to "dot" the trim. Carriage is on the front side and back side of the bag.  Double layer vellum butterflies are also placed here.
The gift tag: Of course, there has to be a gift tag.  This one was made using the one of the Silhouette SVG on line files which has been altered. Tag shape reconfigured to be a a oval shape and a loop "welded" for the gold cord to thread through. A gold trim was added around the tag.  The castle is cut using shimmery white card stock. A double layer vellum butterfly is attached.
Inside the bag: if you hadn't guessed by now, it is a Rhinestone crown!
Thank you for coming by to visit today and hope you also enjoyed this project.

Monday, May 18, 2015

Asian Pagoda Card

When this SVG cut file was released, I must have put out a loud scream of JOY!!!!! Thank you Leo and Mary from SVGcuts.com for this wonderful Asian collection. This temple is only one of 5 projects - and the most impression project is the actual 3D Pagoda which is a box!!!! It is quite the jaw dropping center piece. so..........SVGcuts.com
Spring Blossoms Collection found here. This card was not complicated at all. Gather
Graphic 45 Bird Song Lanterns and Graphic 45 Bohemian Bazaar (Gold Print), American Crafts Pine Cone (brown), Kraft card stock, and Pink card stock. Shown in the photo below are three pagoda cards.  Finished card size: 6" x 6-1/2". No worries, a SVG envelope is included in the cut file, too
Here's a closer look at the roofs: Graphic 45 Bohemian Bazaar (Gold Print) is layered on top of the Graphic 45 Bird Song Lanterns paper. American Crafts Pine Cone (brown) is the finishing accent for the roofs.
A closer look at the Cherry Blossom tree in front. There are "dots" of Stardust Stickles on Cherry blossom centers. Cuttlebug Asian Set Embossing Folder
A look at the bottom half of the Pagoda: altered  the original design by adding Graphic 45 paper is added above the front screens along with brown card stock.
Card flat: see the roof dimensions? The brown card stock ( not part of the original design was added to the bottom roof. This is totally optional.
Card standing up.  This has been altered from SVGcuts.com original design.
Back of the card(and this is what the inside of the card looks like, too). Stampin-Up Naturals Ivory card stock used.
Thank you for stopping by today to visit. Stay tuned for more projects from this collection.

Friday, May 15, 2015

Hawaiian Bear Snow Cones

So if you have visited the Hawaiian Islands, you would have tried those Hawaiian snow cones. These are Hawaiian Bear snow cones in the typical flavoring colors for that oh so hot day.  This is a SVG cut image from svgcutting.com and can be found here. You will need a cutting machine: Silhouette to make these cute images that can be attached to a card, package or just to hand out. I hadn't decided what to do with my snow cones yet but they will be ready for a project.
Here's a look at the individual cone: finished size is 2-1/2" x 3-1/2" oops, it looks like I forgot to add lines to the eyes using a white gel pen.
Another version (with the white gel pen on the eyes) with a waffle cone...................
Thank you for visiting today.......................


Wednesday, May 13, 2015

Hibiscus Tag in a Pinapple Treat Holder

This was a really cute project.  It is a Plastic Pineapple container from the 99 cents store - This treat was inspired by Michele who is on the Jaded Blossom Design Team - her inspiration and blog found here.  The Treat Tag die is from Jaded Blossom and can be found here
There is a Hibiscus stamp set from Jaded Blossom and they also have a SVG cut file to go with it  but I decided to use the cut file by it self and not the stamp this time. Pop the Hibiscus with foam squares. By using the black micro fine pen, the Hibiscus has a little more texture.
Here is one of the Candy Stamps used for the tag:
Candy stamps from Jaded Blossom - set is called Tropical Candies and a 3/4" EK Success circle punch used to punch out.  Adhere the punched imaged onto the back of some candies with adhesive dots. Nugget wraps are from Jaded Blossom - set is called Tropical Designer Tags. Kraft card stock cut 1" x 3" to wrap around the nugget and is a mat for the Tropical Designer Tags.  Momento Tuxedo Black Ink used on Neenah White card stock stamped for both the Tropical Candies and Tropical Designer Tags 
Copic colors used:
*on Tropical Candies: E31, E37, E39, E42, E43,  E51, E81, RV55, B01, Y17, YR18, YR23, YG95, YG05
*on Tropical Designer Tags: RV55, YG05, B01, E31, Y17, YG05
Don't forget to enclose a electronic tea light.

After all the treats are gone, the electronic tea light can be used for a Summer accent on  the table:
Here is that pineapple glowing in the dark:
Thank you for stopping by to visit today