Monday, March 31, 2014

Book Trinket Box Project

Yes, this was one of the many projects from the La-la Land 2 day Craft Workshop.  The newly released Book Trinket Box can be found here and is a project kit that can be used many ways. There is also a You Tube video on how to assemble this box - easy peasy.  I decided to throw in a little Asian flair to the box by using one of the  Graphic 45 Shanghai Girls from their Bird Song Collection.  She fits so perfectly in the opening.  I did keep the Bird Cage (which was the original design) but positioned it off to the left side. All the edges have been sponged using brown ink.   Finished project size is 5" x 6" x 1".  
A view of the side.
Love that spine!
This Large Rolled Rose sits on many layers of the Lotus Die which also sits on the Open Flourish Leaf.
Here's those Large, Medium and Small Rolled Roses (all dies can be found in the La-la Land online store here). The roses sit on the Open Flourish Leaf. The leaf stick pins are from Maya Road: a perfect accent to the roses.
On each corner of the Trinket Box is the Heart Ribbon Corner embellished with adhesive pearls.
And, here is a close-up of the Graphic 45 Shanghai Girl and the Bird Cage...........
Inside the box: completely covered with decorative paper..............lovely!
Hope you enjoyed seeing this project and are inspired....................more to come...........................so stay tuned.

Friday, March 28, 2014

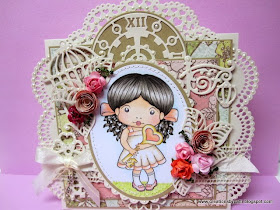
Heart Key Marci Card

Ready for more projects from the La-la Land 2 day Craft Workshop?...........it goes on and on for a little longer. This one is using the recently released Heart Key Marci stamp Finished card size is 7-1/2" x 7-1/2". It is rather an unusual size for a card but definitely impressive.  Two handful of dies used to make this card: yup, 10 of them..........lots of embellishing using La-la land dies found here along with White Viva Pearl Pen, making "dots" through out.  Here you can see the Heart Doily Scallop Boarder at the top of the card with the Scallop Boarder on each side of the card. 
I love Heart Key Marci as a Brunette.  The Grass made by using Copic pens is way cool.  Glossy Accents was added to the pink heart inside the key. Single row stitching around the oval is shown here.  
The Steampunk Clock die used "crowning" the card. 
See the Street Lamp peeking out from under the scallop oval here with White Viva Pearl Pen dots.
A nice touch: adding some randomly Diamond Stickles on the roses.  Note the Large Rolled Rose which is a die from the La-la Land offering. which can be found here.  The Open Flourish Leaf is positioned beneath the batch of roses. Add a row of nice Lace and Taffeta Ribbon for the final touch.
See the Birdcage die used on the left side of the card? Randomly add some Diamond Stickles to the flowers for some shine.
The bottom of the scallop oval is the Heart Ribbon Corner with White Viva Pearl Pen in between the hearts. In this photo, you can clearly see the single edge stitching on two decorative paper mats.
On top of the Heart Key is tied a taffeta ribbon along with a charm hung on twine. So sweet, eh?
Card inside: Love that straight stitching around he white card stock mat as well as on the decorative paper mat.  Use a White Viva Pearl Pen on the Open leaf Flourish and Lock (from the Heart Key and Lock die) 

Now isn't this the coolest project?     So - Stay tuned for more.................

Wednesday, March 26, 2014

Pinata Marci Birthday Card

If you have lost count of how many projects so far posted from the La-la Land 2 day Craft Workshop, this one is project number 8 - we are more than half way to the finish line showcasing all the projects. This is a colorful, fun, happy card made using the newly released Pinata Marci Stamp There is a Pinata Luka Stamp also available found here All dies used are from the La-la Land on line store found here. A couple of the obvious dies used for the background: The Wrought Iron Fence and Large flourish.
Here's a closer look at Pinata Marci as a Brunette (not a Blonde as originally planned). Notice the Headband: love how it was planned to be textured using a variety of colorful "dots".  The candies are also colorful "dots".
Here, you can see the clouds from the Sun, Cloud, Island Die behind the pinata. Just three of them is enough for this scene. Notice the center of the Pinata: those "dots: made by a variety of Green Copics really give this element some nice dimension.
 I love these flowers made using the Lotus Die. Just layer then and add pink adhesive rhinestones.  Candy Time stamped message is part of the stamp set. You can see the Grass Border die layered twice for dimension behind the flowers.

Card inside........of course, there's decorative paper mats and the newly released Birthday Flag (see the darker color off set to give some dimension?).  The leaves are from the Open Leaf Flourish die and the flower was made using the Water Lily Die. Love that adhesive pink rhinestone.
This is a really nice girly card to make and give.....................stay tuned for more projects to come..........

Monday, March 24, 2014

World Traveler Luka Card

Here's another 6" x 6" card from the recent La-la Land 2 day Craft Workshop that will create a stir - so cute and lots going on.  All dies and stamps used for this card can be found on the La-la Land on line store found here. The card is flanked by the recently released Steampunk Boarder die on three edges.  The brown ink sponging on the edges of many elements and single row stitching around the mats really adds to this card. 
World Traveler Luka looks great in his wonderful earth colors with a red scarf accent (original color was green).......he stands on top of the Stitched Scallops Border.
The Book Tab and Labels Set looks great here (also with the embossing) with those brads. Notice the two decorative papers have single row stitching on the edge?
Cut out the stamped message to position on the side on top of the Hot Air Balloon (a die).
Never waste anything!  Card inside are parts of the Book Tab and Label Set die and Stitched Scallops Border used.  Inside white mat has straight stitching around the mat for some added interest.  Do you also notice the straight stitching on the decorative paper mat, too? Cool, eh?
On the back, part of the Book Tab and Labels Set used as the final embellishment for this card.
It was really fun to make this card.....................so many interesting elements. Want to try one? Stay tuned for more projects from this event...................


Friday, March 21, 2014

Wonderland Drawer Box

Are you ready for another "knock your socks off" project from the 2 day La-la Land Craft Workshop? This Project is using the Drawer Box Project Kit with the Queen of Hearts Marci, Marci in Wonderland, and Mad Hatter Luka stamps which all can be found in the La-la Land on line store here. Finished project size is 9-1/4" x 3-1/4" x 6-1/2 tall. This was a detailed project which used 16 dies and 49 die cut pieces.......all dies can be found here..........whew!!!! The results are just amazing. Looks complicated?  It is simply a triple easel card layout on top of the Drawer Box.
A closer look at the drawers in this project. Tim Holtz hitches were used for the pulls. Behind the hitched are the double layer petals from the Lotus Die and Large Flourish (which was cut apart). A nice touch, eh?
 Here's one of the drawers pulled out:
On the left easel, the Queen of Hearts Marci is stamped with some textured stamping and sponged edges on both the Kraft Circle and the Vanilla Circle. Marci's Filigree Crown is a cool die (cut twice and glued together) with some textured stamp images and Gold Viva Pearl Pen. Part of the Wrought Iron Fence (double layered for thickness) peeking out on the sides, too.
In the middle easel, Marci in Wonderland stamped with some textured stamping and sponged edges on both the Kraft Circle and the Vanilla Circle. Behind Marci in Wonderland is a Large Flourish with some Gold Viva Pearl Pen adornment. There is part of the Wrought Iron Fence (double layered for thickness) peeking out on the sides, too.
On the left easel, Mad Hatter Luka stamped with some textured stamping and sponged edges on both the Kraft Circle and the Vanilla Circle. A third part of the Wrought Iron Fence (double layered for thickness) peeking out on the sides here. Also peeking out of this third easel is the Heart Banner with dots from using a Gold Viva Pearl Pen after edging the banner in brown ink and stamped with some texture.
On the right and left side of the shelf (or the base of the easel card), there are Rolled Roses along with the Open Leaf Flourish and a punched butterfly from Martha Stewart.  A Gold Viva Pen used for the butterfly center. 
In the center shelf: three Rolled Roses sitting on the Lotus layers Die with the Open Leaf Flourish. The Heart Key and Lock have been edges with some brown ink and textured stamped. 
At the top of the project is two layers (glued together) of the Heart Ribbon Corner with Gold Viva Pearl Pen dots. Glue together two layers of the Scallop Boarder on top of the roof, sponge the edges and stamp it, then add Gold Viva Pearl Pen dots.
Sides of project: You can see the 2 layers of the Heart Doily glued together is wrapped around to the back to form a "wall".  The Heart Love the Rolled Roses  and Open Leaf Flourish and Punched Martha Stewart Butterfly simply tucked in the edge.
 Back of project: A Heart Doily in the back, too (of course, it is double layered to make it sturdy just like the sides). 
Now is this the coolest project or what?  Stay tuned for more projects to come...........

Wednesday, March 19, 2014

Birthday Cake Marci

Another card from the La-la Land Craft Workshop: this 6x6 card is festive and has so much color! Do you remember a similar card previously posted from October 2013 La-la Land Retreat?  It was originally designed by Sue Kohler posted here in different colors with a some rolled roses? Well, replace the rolled roses with the Heart Banner die and the Birthday Cake Marci and you get this wonderful card. The Heart Banner is cut twice:once color is offset for dimension. For the bottom shaped edge, use the Fancy Bracket Die twice, one is offset to show the color. All dies used for this card can be found here at the La-la Land shop. And, don't you love the adhesive pearls in between the String of Hearts
 Here's a closer look at Birthday Cake Marci:
 Card inside using the left overs from die cutting the front shape
OK- stay tuned for more projects o come........................

Monday, March 17, 2014

Sailboat Luka Card

Here's yet another great card from the two day La-la Land Craft Workshop:
This finished 6" x 6" card is simple to make.  Luka is a Brunette (originally planned as a Blonde) and his sweatshirt was planned to be a orange color - I changed it to a Kraft color.   each card layer is popped with foam squares.  Luka is also popped with foam squares. 
Here's a closer look at Lucka: 
 The two Flag Banner Dies (found here) are offset to provide dimension. 
 The stamped message:
 Card inside is simply stamped with the Sailboat Luka image.
 Stay tuned for more projects from the  La-la Land Craft Workshop.....................

Friday, March 14, 2014

Wheelbarrow Marci Spring Front Card

Another ongoing post from the La-la Land Craft Workshop: This intricate card is special.......why?  Because it was featured three times in the newest publication of Annie's Interactive Cards 2........see the details at the end of this post.  Finished card size is 6" x 6". I love the colors as well as the papers used for this card.  It is really Spring-like.  Only 9 dies were used for this card........can you find them all? 
Overhead view of this card: see the Flag Banner die used on the inside ........
See the Heart Tree die used on the back edge (it was cut in half):
This is the Lily of the Valley Die with a Gold Viva Pearl Pen used for additional dimension positioned on top of the Large flourish.  The Heart Fence is behind the Lily of the Valley.
The "faux roof" is made using 2 pieces of the Stitched Scallops Border Die positioned on the top edge. And, of course a Butterfly Die is used - smaller Butterfly is a Martha Stewart punch. Add the Gold Viva Pearl Pen to the butterfly center.
And, here is Marci (as a Brunette, again)..........cute, eh?
This is the card inside:
And, of course, the back of the card is also embellished with the Heart Doily Border Die and two Martha Stewart punched Butterflies. Add the Gold Viva Pearl Pen on the butterflies for some interest, too.
The details on the publication of this card:
A new publication recently was available and Irina (Designer and Owner) of La-la Land was featured on the Forward, page 3, and on Fun Fold pages 48, 49. Note; there are details on how to make this card. Go out and get your copy!!!!
Love this card......hope you are inspired.