Friday, June 28, 2013

Pool Table decor

I have been wanting to make this 3D Pool Table for a while and finally had an occasion to do so.  It is for a birthday gift (a guy).  This pool table is pretty realistic and very sturdy.  The SVG cut file is from my favorite site: SVGcuts.com collection called The Green Room. Finished project size is 7-1/2" x 3-5/8" x 4-1/4". I used papers and scraps I had on hand. And, it doesn't take much paper at all.
Here are the balls: they are popped with foam squares and a white gel pen used on each ball.
Another view: the cue stick is made using Kraft paper and edges are sponged with brown ink. I did move the pool table black dots - I was told they are at opposite ends and not together as in the original cut file........like I know? But this guy plays pool and he will know.
I love the decor panels on the side - I decided to cut two sets for the pool table (instead of one as in the instructions) to decorate the front and back. Note the entire pool table edges have brown ink.
Surprise - the pool table is a box - LOVE it! I did add a liner for the inside.  Inside measurements are 4" x 7" x 2". There's plenty of room to fill this with lots of different treats. 
Hope you enjoyed this posting.  Be sure to check out the SVG collection - SVGcuts.com always provides a video tutorial for all their projects.  It's a great reference. happy crafty day to you!
 

Wednesday, June 26, 2013

Casino Night Themed Birthday

Here's a birthday card for a Casino Night themed event. I've made one of these cards previously posted here with a different message. This is a SVG cut file from the SVGcuts.com collection called The Green Room. It is a really versatile collection for those GUYs. Finished card size is 6-3/4" x 4". I especially love the shape of the cards - and do you also like the hand that has been dealt?  "happy birthday" was cut using SCAL (Sure Cuts a Lot) computer program/Arial Font with a black offset mat behind the red card stock.
This card has a silver mat - paper used is from American Crafts.
Do you like the chip with the "70" - well, it is an indication of the milestone birthday event.
Card inside: stamped message (from Papertrey Ink:  Movers and Shapers Sentiments)
The cut file from SVGcuts.com also includes an envelope to perfectly fit this shaped card: cool, eh?  I did find a strip of Casino-like scrapbook paper to decorate the envelope.  The words were cut using SCAL/Arial font. 
I know Cal will enjoy this card. Thank you for stopping by today.


Monday, June 24, 2013

Asian Shadow Box

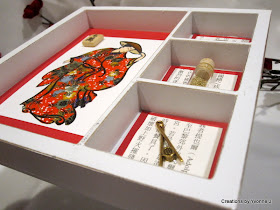
Wow - is a girl lucky or what? I got this so fabulous shadow box from my swap friend: Yvonne J. Yvonne specializes in fabulous Asian projects so I am always thrilled to receive them.  This shadow box is white. The size is 6-5/8" X6-5/8" X 7/8".  Each small box size inside is 1-7/8" x 1-7/8". 
The Asian woman inside opening size is 5-7/8" x 3-7/8". Love the Washi paper used on the Asian woman.  There is a small "mah jong" tile adhered on the top left corner. See the detailed photos below.
Here's one of the boxes with a Asian coin on "newspaper" print with red background:
The 2nd box is a small bottle filled with gold micro beads - hmmm, I have some of those micro beads somewhere. 
The last box is a gold charm: chopsticks holding a sushi roll............nice!!!
Here's a little side view of the shadow box - it is made of wood and painted white.  I'm not sure where she got this but isn't it just wonderful. I'd love to get my hands on black shadow boxes.
It was a real big surprise to receive this in the mail - I was jumping up and down with JOY!!!!
Hope you also think it is great, too. 

Friday, June 21, 2013

Asian Flip Card

My friend Jan C. sent me this fabulous flip card. She knows how I love 3D cards and this one is one of my favorite styles................finished card size is 5" x 5" - fully opened, card measures 6-3/4" x 5". There is Washi paper accent on the top, bottom, front and back of the card as well as in the shaped center section.
Here's a closer look at the center of the image. It is so gorgeously colored. The Washi paper is the perfect scaled size for this card.  Gold accent along the shaped edge, too. Isn't it so gorgeous?  I love the gold throughout the red background Washi. The little girl has gold in her dress, too.
 
Here the card is "flipped" open to reveal the message underneath. It is a black embossed Kanji word for Love. I love those square adhesive "stones". I've seen them in the stores but never knew what to do with them.............so here's a great way to use them.  I am glad to learn something new each day!
Here's a closer look at the stamped Kanji. There is a small gold ring around the label - Jan is so precise in her cutting and "line" edging.   Hmmm.........I need to figure out how to do that.
THANK YOU Jan for such a great card............I really LOVE it!!!!

Wednesday, June 19, 2013

Hello Kitty Birthday Fun

Ready for some Hello Kitty fun? I'm not sure when my friend's birthday is - whenever it was, I am late so this is a belated birthday wish for her.  She is a Hello Kitty fan so I incorporated Hello Kitty into her birthday card. It is using the 3D Accordion Flip album made by Sizzix/designed by Karen Burniston.  You can make this project as long as you want which makes it very easy to customize. This is one side of the card with the various Hello Kitty(s) and one the end is a 2013 calendar. Paper used is from My Little Shoebox: Cherry Delight - Serenity. Small adhesive pink rhinestones were added to the centers of the flowers throughout the panels.  Pink card stock is Core-dinations Gemstone Pink Dancing. Brown card stock is Recollections.
Backside: The 'happy birthday" is positioned at the left side (flip side is the calendar) which can be cut off if desired.  "happy birthday' is a cut file from the on line Silhouette store.  Her name is cut using the Sizzix Bigz Serif Alphabet Letters. Brown card stock was adhered to the chipboard before running it through the Big Shot, then use a Brown Marvy pen to ink the chipboard sides.
Overview:
For the Hello Kitty - only the head portion is used from the Sizzix sizzlit die, the body portion is a SVG cut file Kyoto Kuties from Under the Cherry Tree. On these two panels, the temple with the lanterns is from the Lettering Delights Asia SVG collection and the Bridge is from the Cricut Pagoda Cartridge cut at 1-1/4". Red lantern is from Memory Box Paper Lantern Die. Grass accents is from EK Success Martha Stewart grass edge punch. Embossing folders Fancy Fan (Stampin-Up), Square Lattice (Stampin-Up), Asia set (Cuttlebug), and Swiss Dot (Cuttlebug) are used on Hello Kitty main body. Each Hello Kitty is popped with foam squares.
These two panels also have elements from the Lettering Delights Asia SVG collection: the gateway to Tokyo and the Birdcage are the back drops behind Kitty.
Fifth panel has a enlarged EK Success Martha Stewart Punch Around the Page: Canning which was manipulated in SCAL:
On the backside, you can notice there lanterns in Brown, Pink, and Red, cut from Memory Box Paper Lantern die and strung on a silver cord. Loops were cut 1/16" wide to wrap around the cord. All the lanterns were sponged with brown ink.  Adhesive pink rhinestones are scattered throughout these panels.
On each panel, Memory Box Woodland Branch Die used .  Flowers are from a an Old Stampin-Up punch (It came in a set of 3) and a sakura flower punch:
A closer look at one of the lanterns:
See those punched flowers: use a glitter pen for the centers.
Here's the "happy birthday"
Note the fan is scored to resemble the fan lines:
To make those small flowers, use a glitter pen for the centers, sponge the edges with some color, then use the "ball" tool to "cup" the flowers.  A little glossy accent will work to randomly adhere to the branch.
A really fun project to create ........hope this will inspire you to make one, too

Monday, June 17, 2013

A Fun Graduation

I got a little carried away with this upcoming graduation for my Grand Neice. School colors are Blue and White. Lots of things in this one photo: a Candy/Surprise lei, Glasses, a card, and a small photo album for those memories - forgot to take a photo of the graduation bubbles - too cute!!!! So here are all the details below.
First up: 2013 Glasses SVG cut file is from My Scrap Chick found here.
The Card: Love it!!!  Graduation Girl is from SVG Cutting. Collection is called The Grad found here. Congrats shaped card is from DC9 (Designs on Cloud 9) found here. Paper used is from Scrapbook Customs Graduation Word Collage #92599. The stars are punched using Recollection Silver Glitter paper.
Here's a closer look at the paper piecing of the Grad: Stampin-Up Brilliant Blue card stock used, Recollections White, Recollection Silver Glitter paper, Wassau Metallic Black, Wassau Metallic Blue, Neenah White.......yes, Neenah white used to cute the girl, then Copics color E21, R20 - brilliant, eh?
 Surprise - it is a wobble grad!!!! So don't you just love it?
Card inside:  Message is stamped (from Hero Arts). A white brad on the center of the graduation hat.

Now the mini book: OMG - YES, it is one of those RETIRED BIDDY BOOKS Stampin-Up used to carry. They NO longer have them and I have been sparingly using them for special occasions. The album is covered using the paper from Scrapbook Customs Graduation Word Collage #92599. Scallop Frame on Mini Album case found in SVGcuts.com Collection called My Day with Dad - easy to make a smaller size using SCAL computer program. The Grad girl is from SVG Cutting. Collection is called The Grad found here. Just like the card: she is made using Wassau Metallic Black, Wassau Metallic Blue, Neenah White with Copics color E21, R20.
The Grad and Class of 2013 are popped with foam squares:
Mathematics and Science words used for charms are from the Silhouette on line store. Some metal charms from my stash are hanging from seam binding tape (lucky I had the right color)
 The album cover is a  image from the Silhouette on Line Store - the star is hand cut using Recollection Silver Glitter paper:
 Album inside: Darice Graduation Kat embossing folder  and punched stars:
Finally, the Lei: my first one ever made. Instead of wrapping this Lei with all candy, there are some surprises: mints, headbands, funny erasers, and jewelry......darn, I forgot to put bills in there, too........aw, shucks!!! The white curling ribbon is used to hold the surprises together. I
 I hope she will like it................she's 11 years old!!!!

Friday, June 14, 2013

Onesie Party Favors

Updated 6/16/13: see below in red
A quick and easy party favor for the family. I made 28 of these.  Finished size of this treat is 3-1/4" x 3-1/2" x 1-1/4" and will hold (1) individually wrapped Madeline cookie and (1) Ghiradelli Chocolate Square. Since we did not know if she was having a boy or girl: pastel colors are chosen in Lavender (Recollection's Purples), Yellow (SU Barely Banana), Light Green (SU Certainly Celery) Memento Black ink and Hero Arts Stamp & Cut Onesie.  Th cute little punch and embossed teddy bear is a Martha Stewart Punch that is popped with foam squares and embellished with 1/8" satin ribbon..................fun to tie a bow so small. The bows are attached using Glossy Accents.
 Here's the treats in the box: yummy
A closer look at the lavender one: each onesie is embossed with Cuttlebug Swiss Dots Embossing Folder. Base of the treat box is Recollection Vanilla card stock.
 The Lt. green one:
 The Lt Yellow one:
 Back of the treat box: Computer font used is "Lobster 2" and  a Marvy punched baby bottle
To make the box (middle section): here's a side view photo.  Cut a strip of card stock 2-1/4" wide x 7-1/4" long.  On the 7-1/4" side, score 2-1/2", 4-3/4". Rotate paper, then score on the 2-1/4" side 1/2" , 1-3/4".   You will need to cut slits at the 2-1/2" score line to make a "u" shape for the box.  Apply tape or glue to the 1/2" sections. Attach the onesie to the "u" shape.

A look at the Hero Arts "Stamp and Cut Onesie " Set used:
Updated 6/16/13: note the stamp+ die was purchased from a recent warehouse sale at Hero Arts. It was made exclusively for Archiver's.
Hope you are inspired to turn any of your stamp sets into treat boxes...............just create that "middle section and you are well on your way................happy day to all!